Dark chocolate dipped almond biscuits with sea salt

DSC_8375-3

I was recently asked by the lovely founder of 1999 Magazine, 16 year old Ruby, to create a recipe that would feature in the first issue. “1999 is a magazine that celebrates and encourages creativity” with recipes, articles, artwork and photography from an array of contributors. It’s a pleasure to be featured and the magazine is such an amazing and cool achievement for Ruby, so everyone head over to 1999 and order your copy!

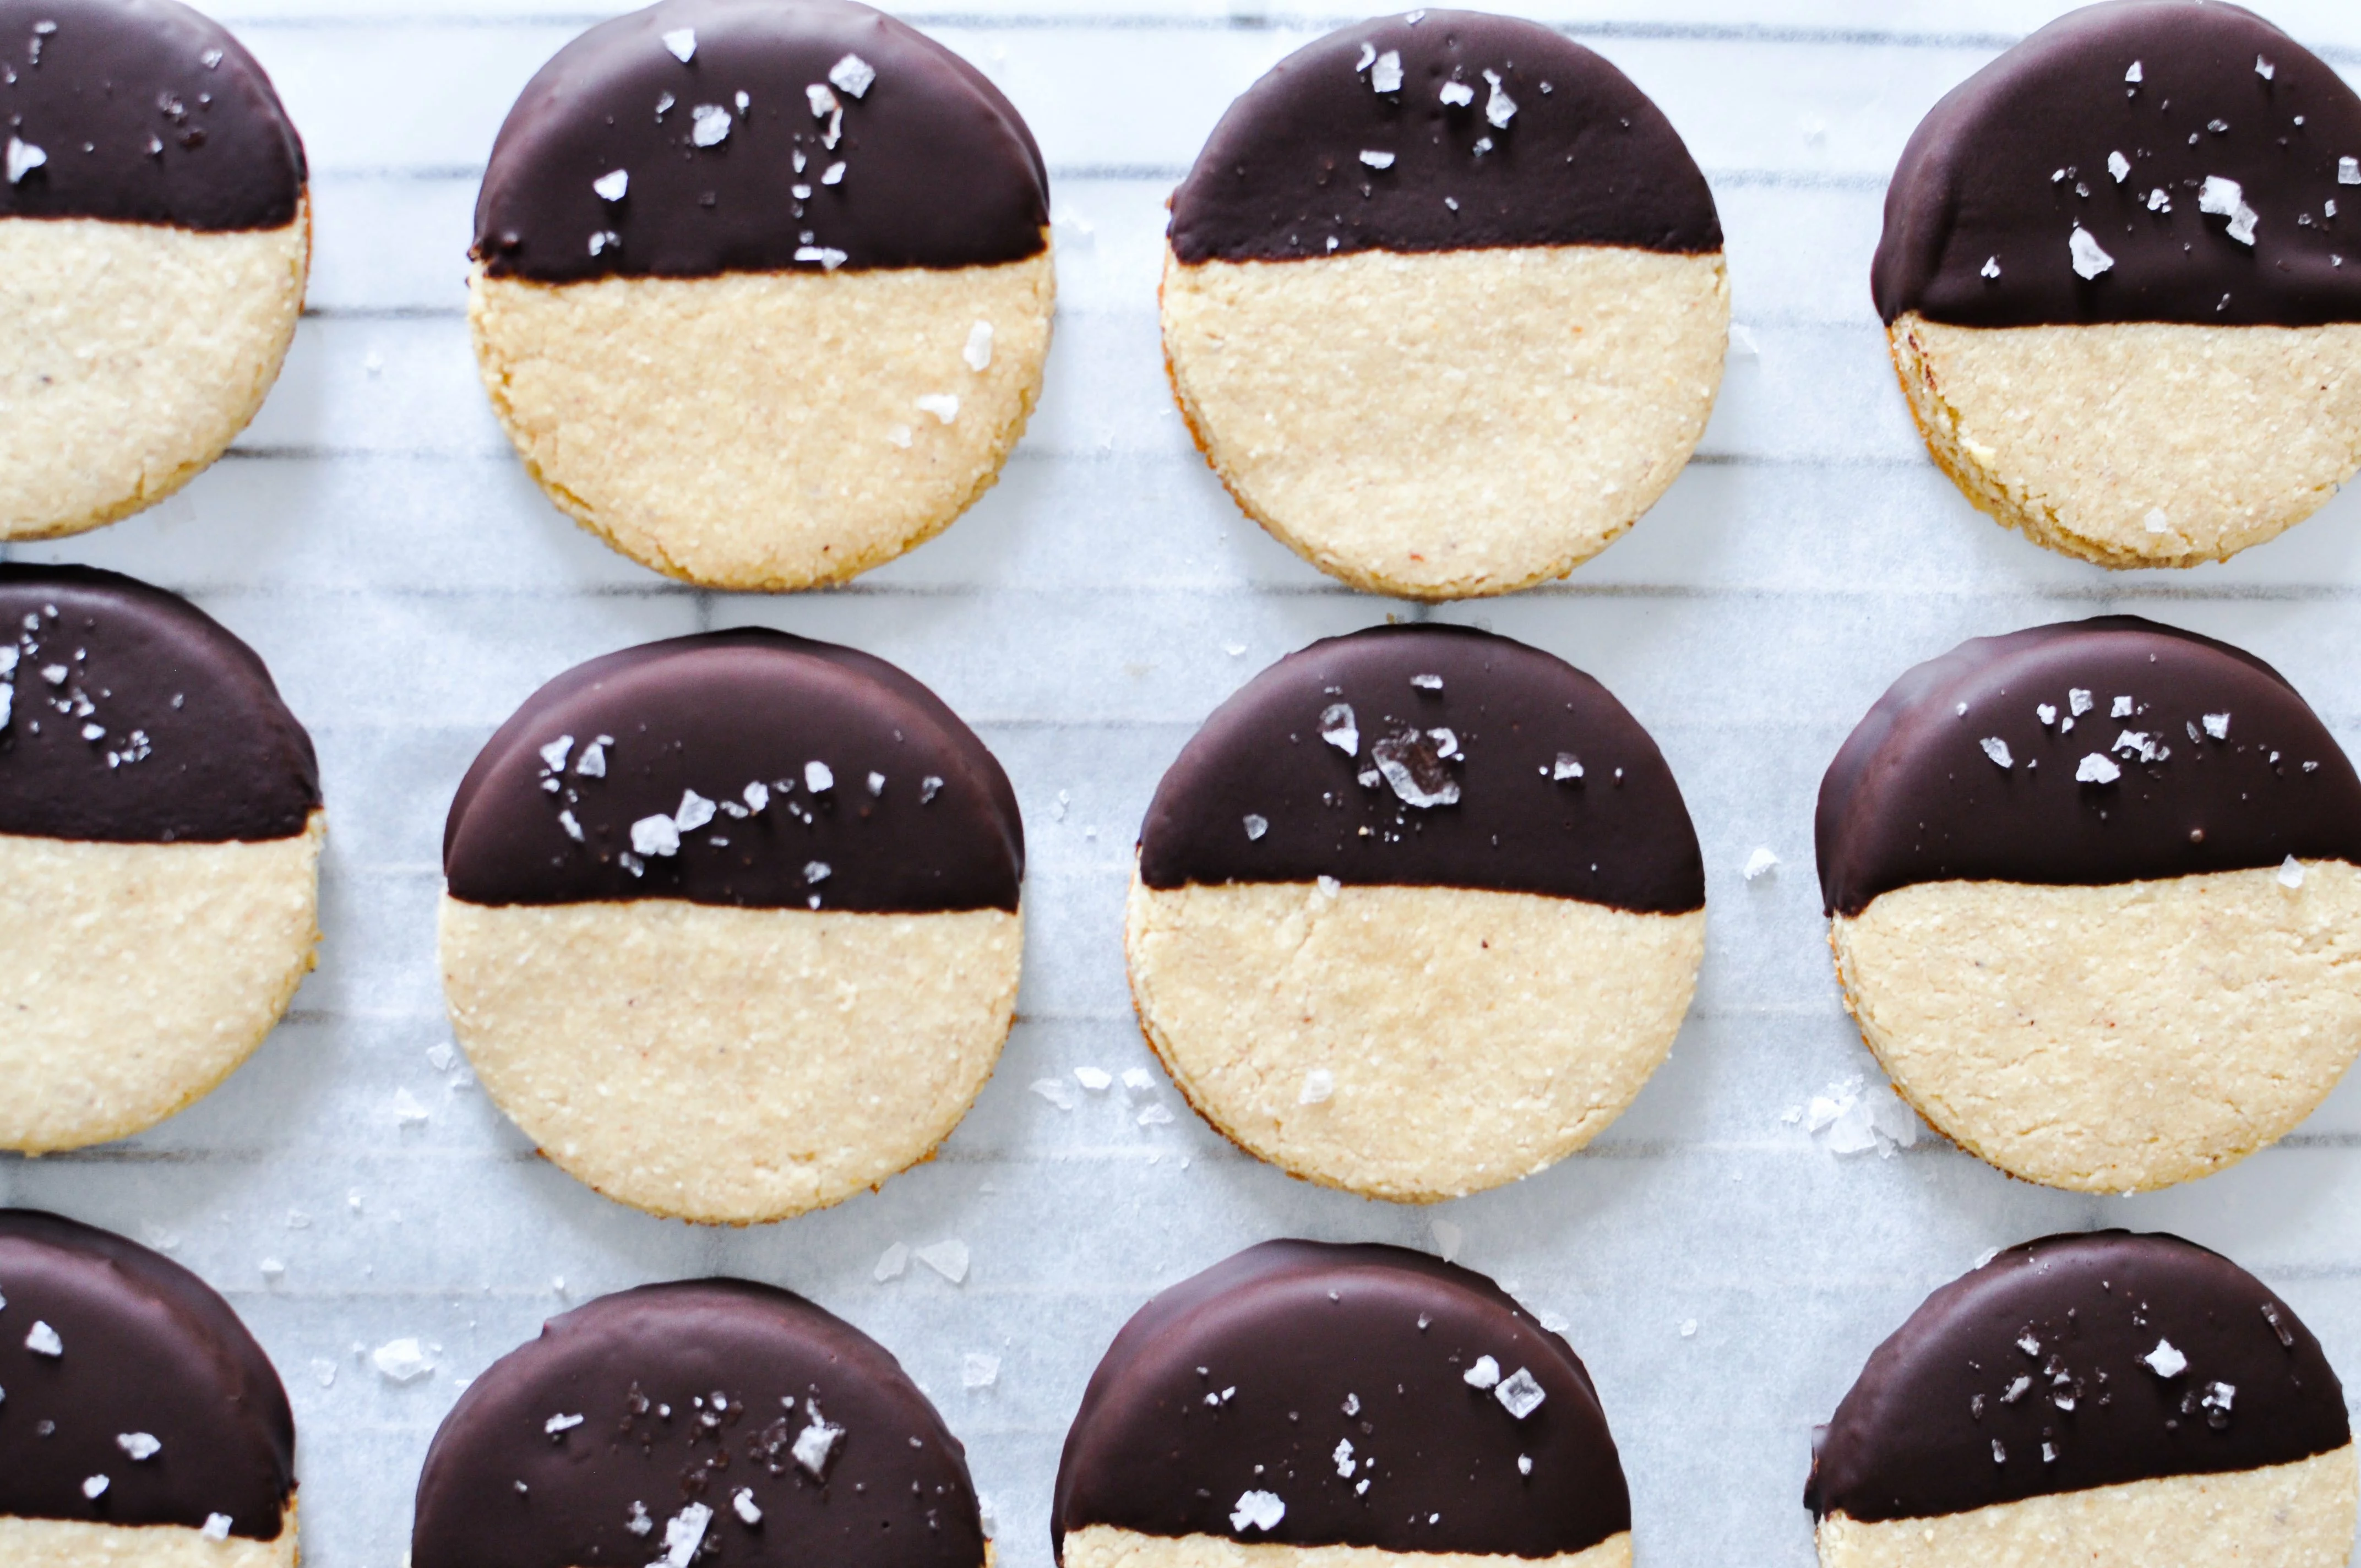
I couldn’t resist sharing the recipe on my blog too so here you have, my dark chocolate dipped almond biscuits with sea salt. These gluten and grain free biscuits are packed with protein and fibre from the ground almonds and coconut flour, yet remain completely soft and smooth inside. The almondy-deliciousness is really brought out by the vanilla and almond extract; start with half a teaspoon of almond extract, but add more if you want a little bit more of a ‘marzipan’ taste. The addition of the healthy fats from the grass-fed butter or coconut oil provide a great flavour to the mix; you only need a touch of sweetness from the pure maple syrup to satisfy your taste buds. Incredibly simple but so good.

DSC_8320-2DSC_8396

Dark chocolate dipped almond biscuits with sea salt Makes approx. 12 biscuits

200g ground almonds 6 tbsp coconut flour 1/4 tsp baking soda Pinch of sea salt 3 tbsp pure maple syrup 3 tbsp organic unsalted butter or coconut oil, at room temperature 1 tsp vanilla extract or seeds from 1 vanilla pod 1/2-1 tsp almond extract 1 free range egg 75g dark chocolate (I use Green & Black’s 85% cocoa)

Preheat the oven to 350F/175C.

Place the ground almonds and coconut flour in a food processor and blitz for a minute to create a smoother flour. Add the baking soda and a pinch of sea salt and continue to mix. Add the maple syrup, coconut oil/softened butter, vanilla, almond extract, and the egg. Blitz again until a dough-like mixture forms. You could also do this by hand.

Tip the mixture onto a clean surface and roll into a ball. Place the dough into the fridge for about 10-15 minutes to chill.

Take the dough out of the fridge. Using a rolling pin, roll the dough out until it has a thickness of about 1cm.

Using a glass or cookie cutter, cut out the desired shapes and place onto a baking tray lined with parchment paper. I used a glass with a diameter of 6.5cm to cut the shapes.

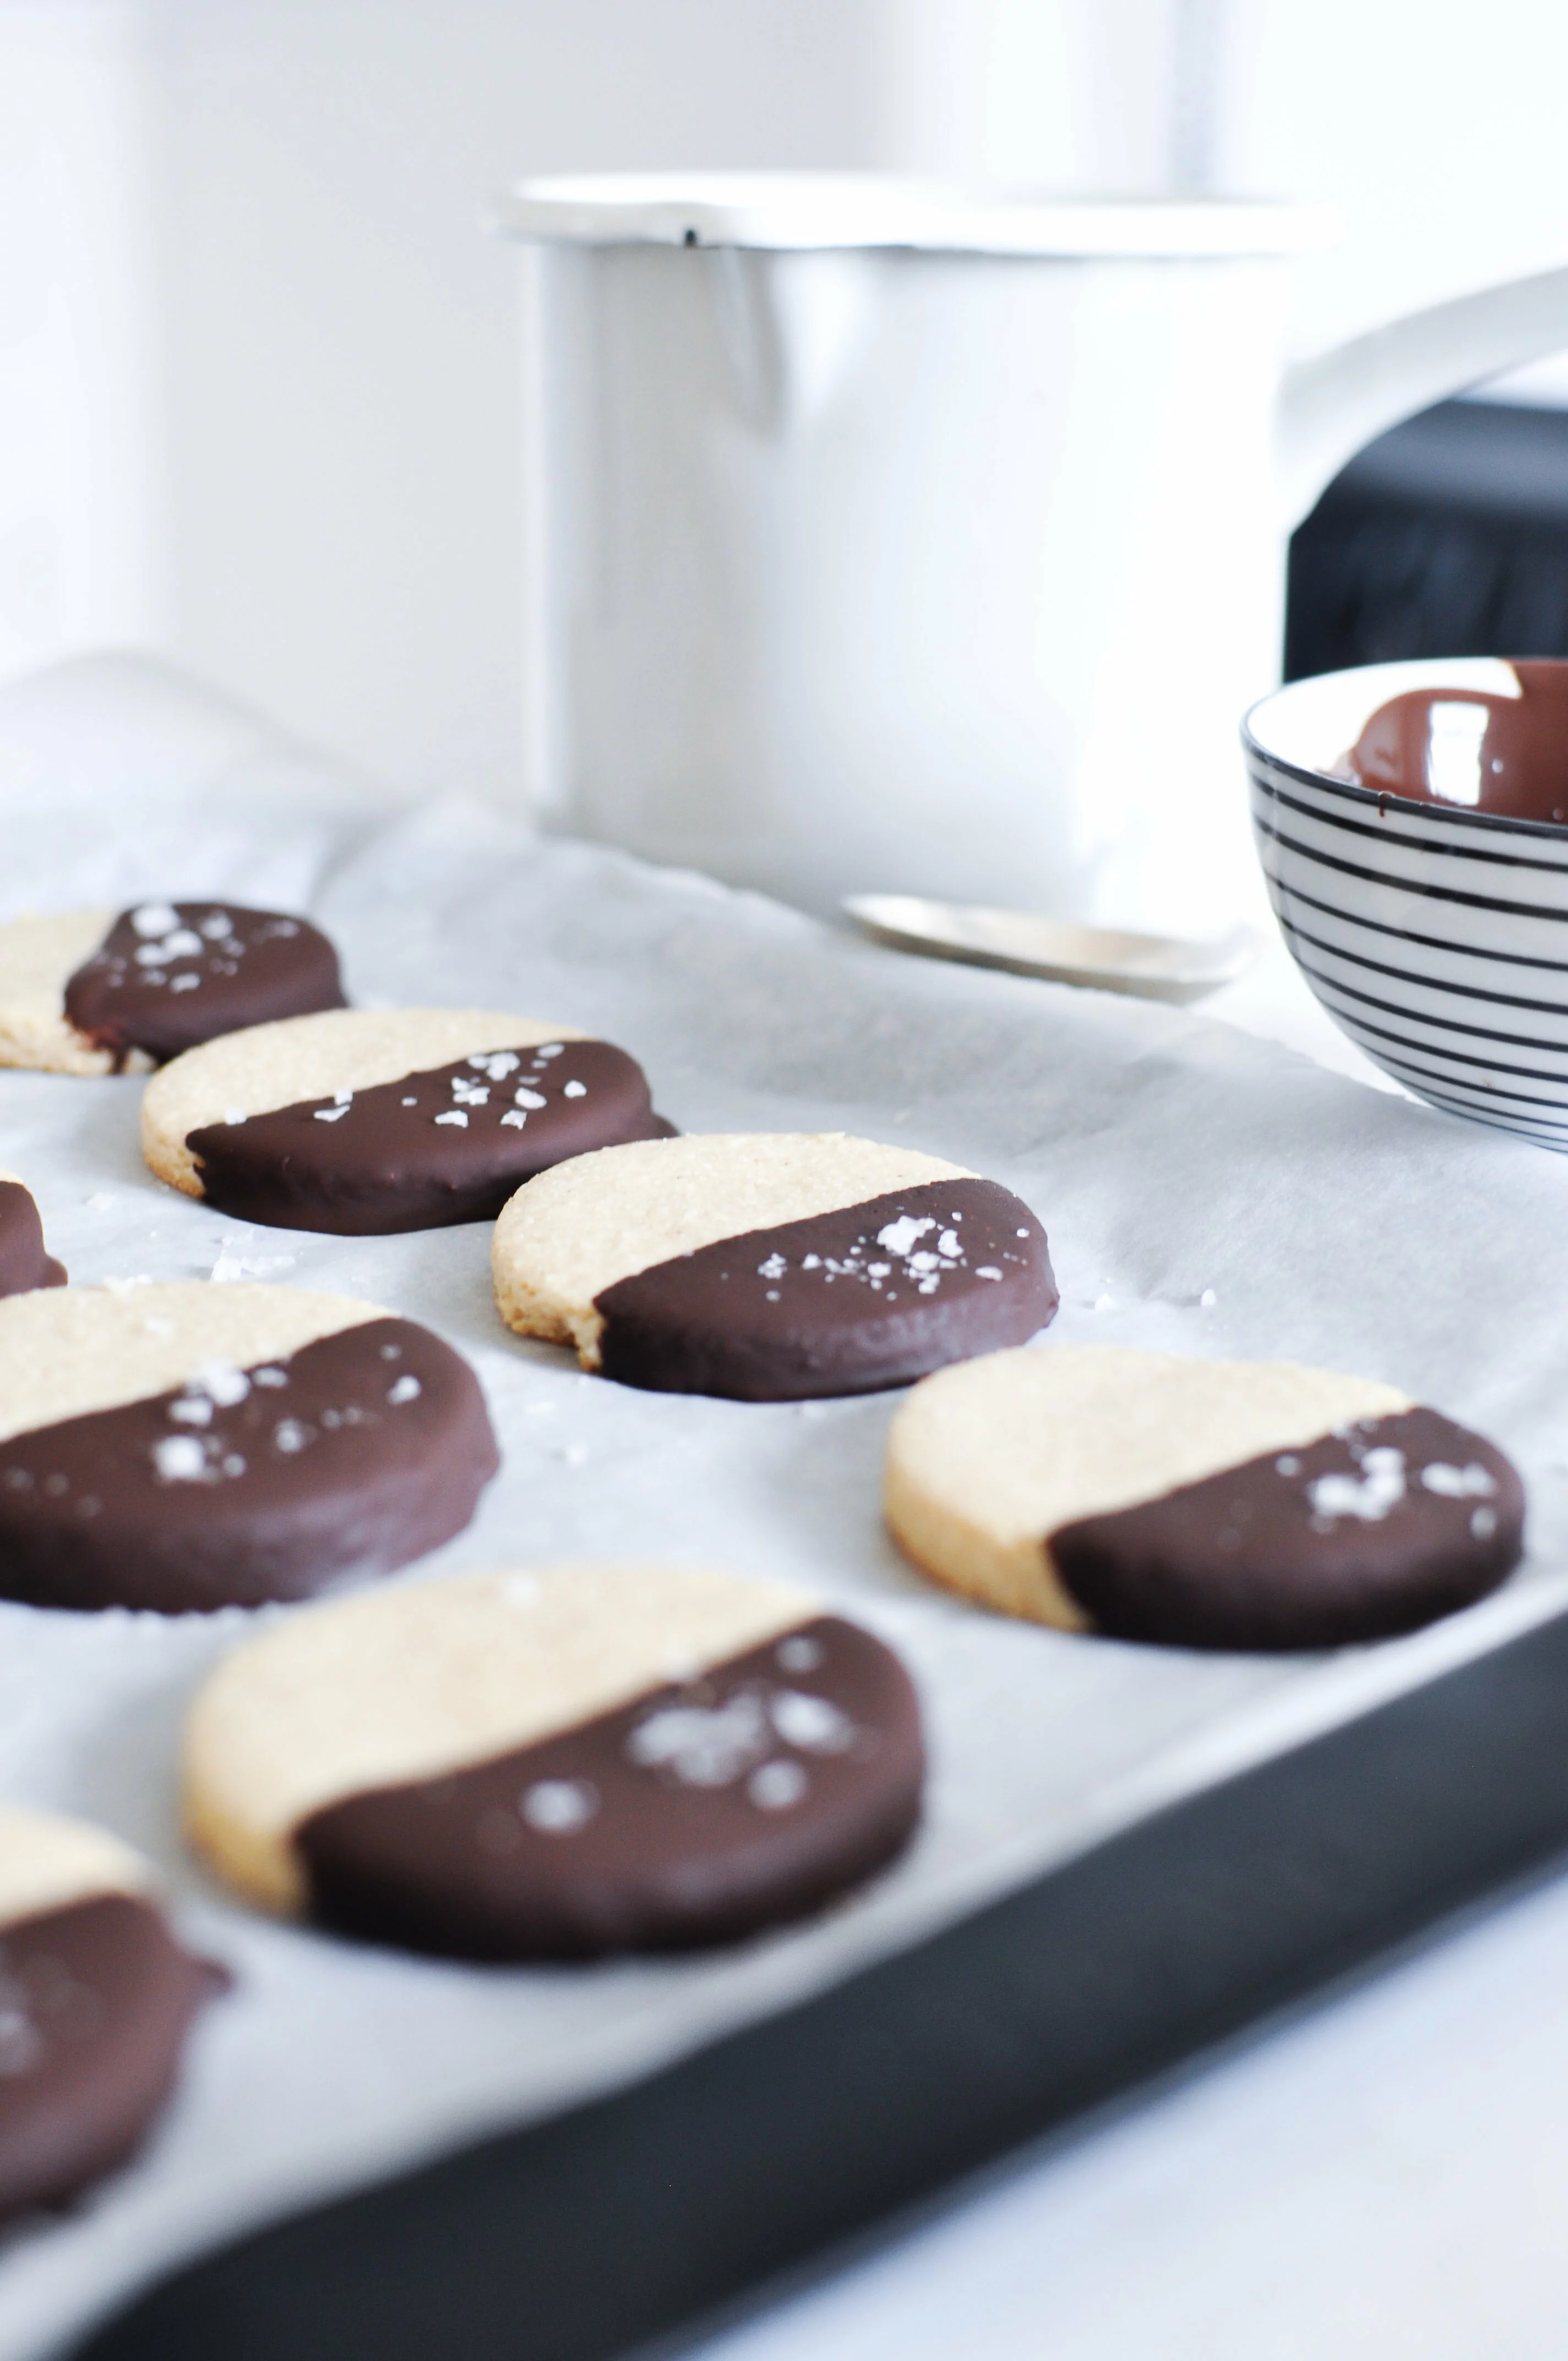
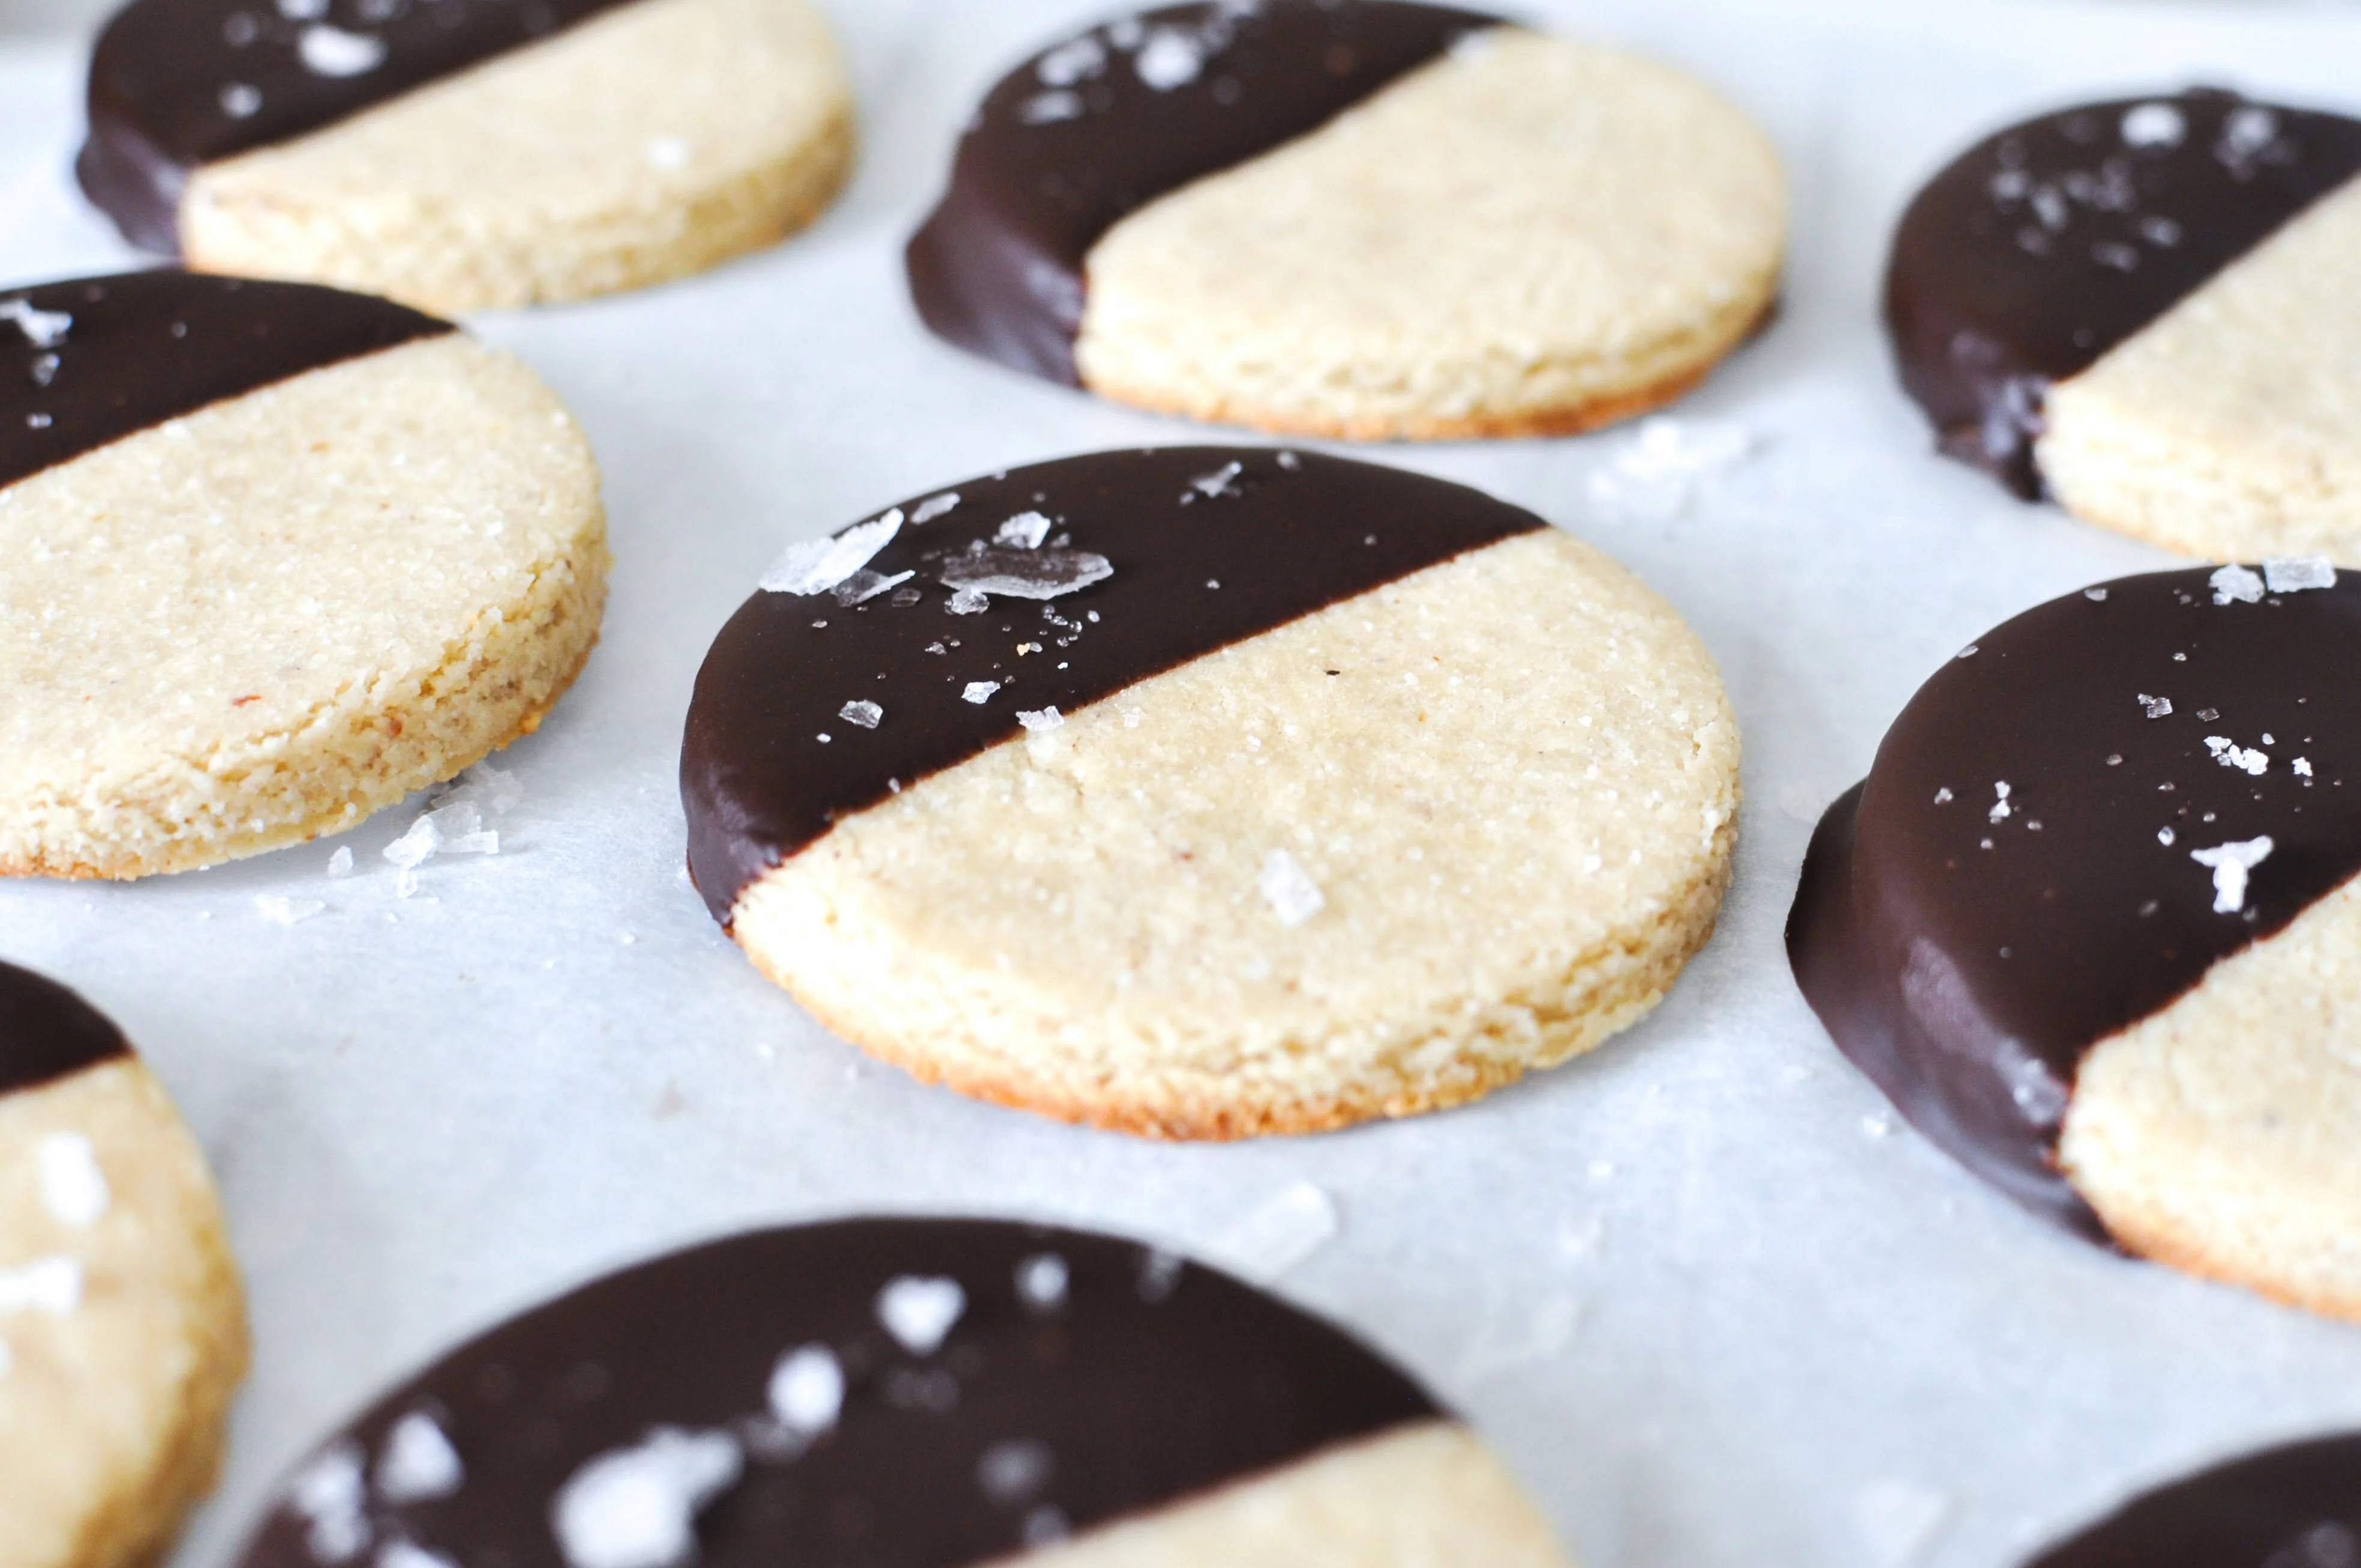
Bake for 8-10 minutes, until lightly golden. Then allow the cookies to cool on a cooling rack.

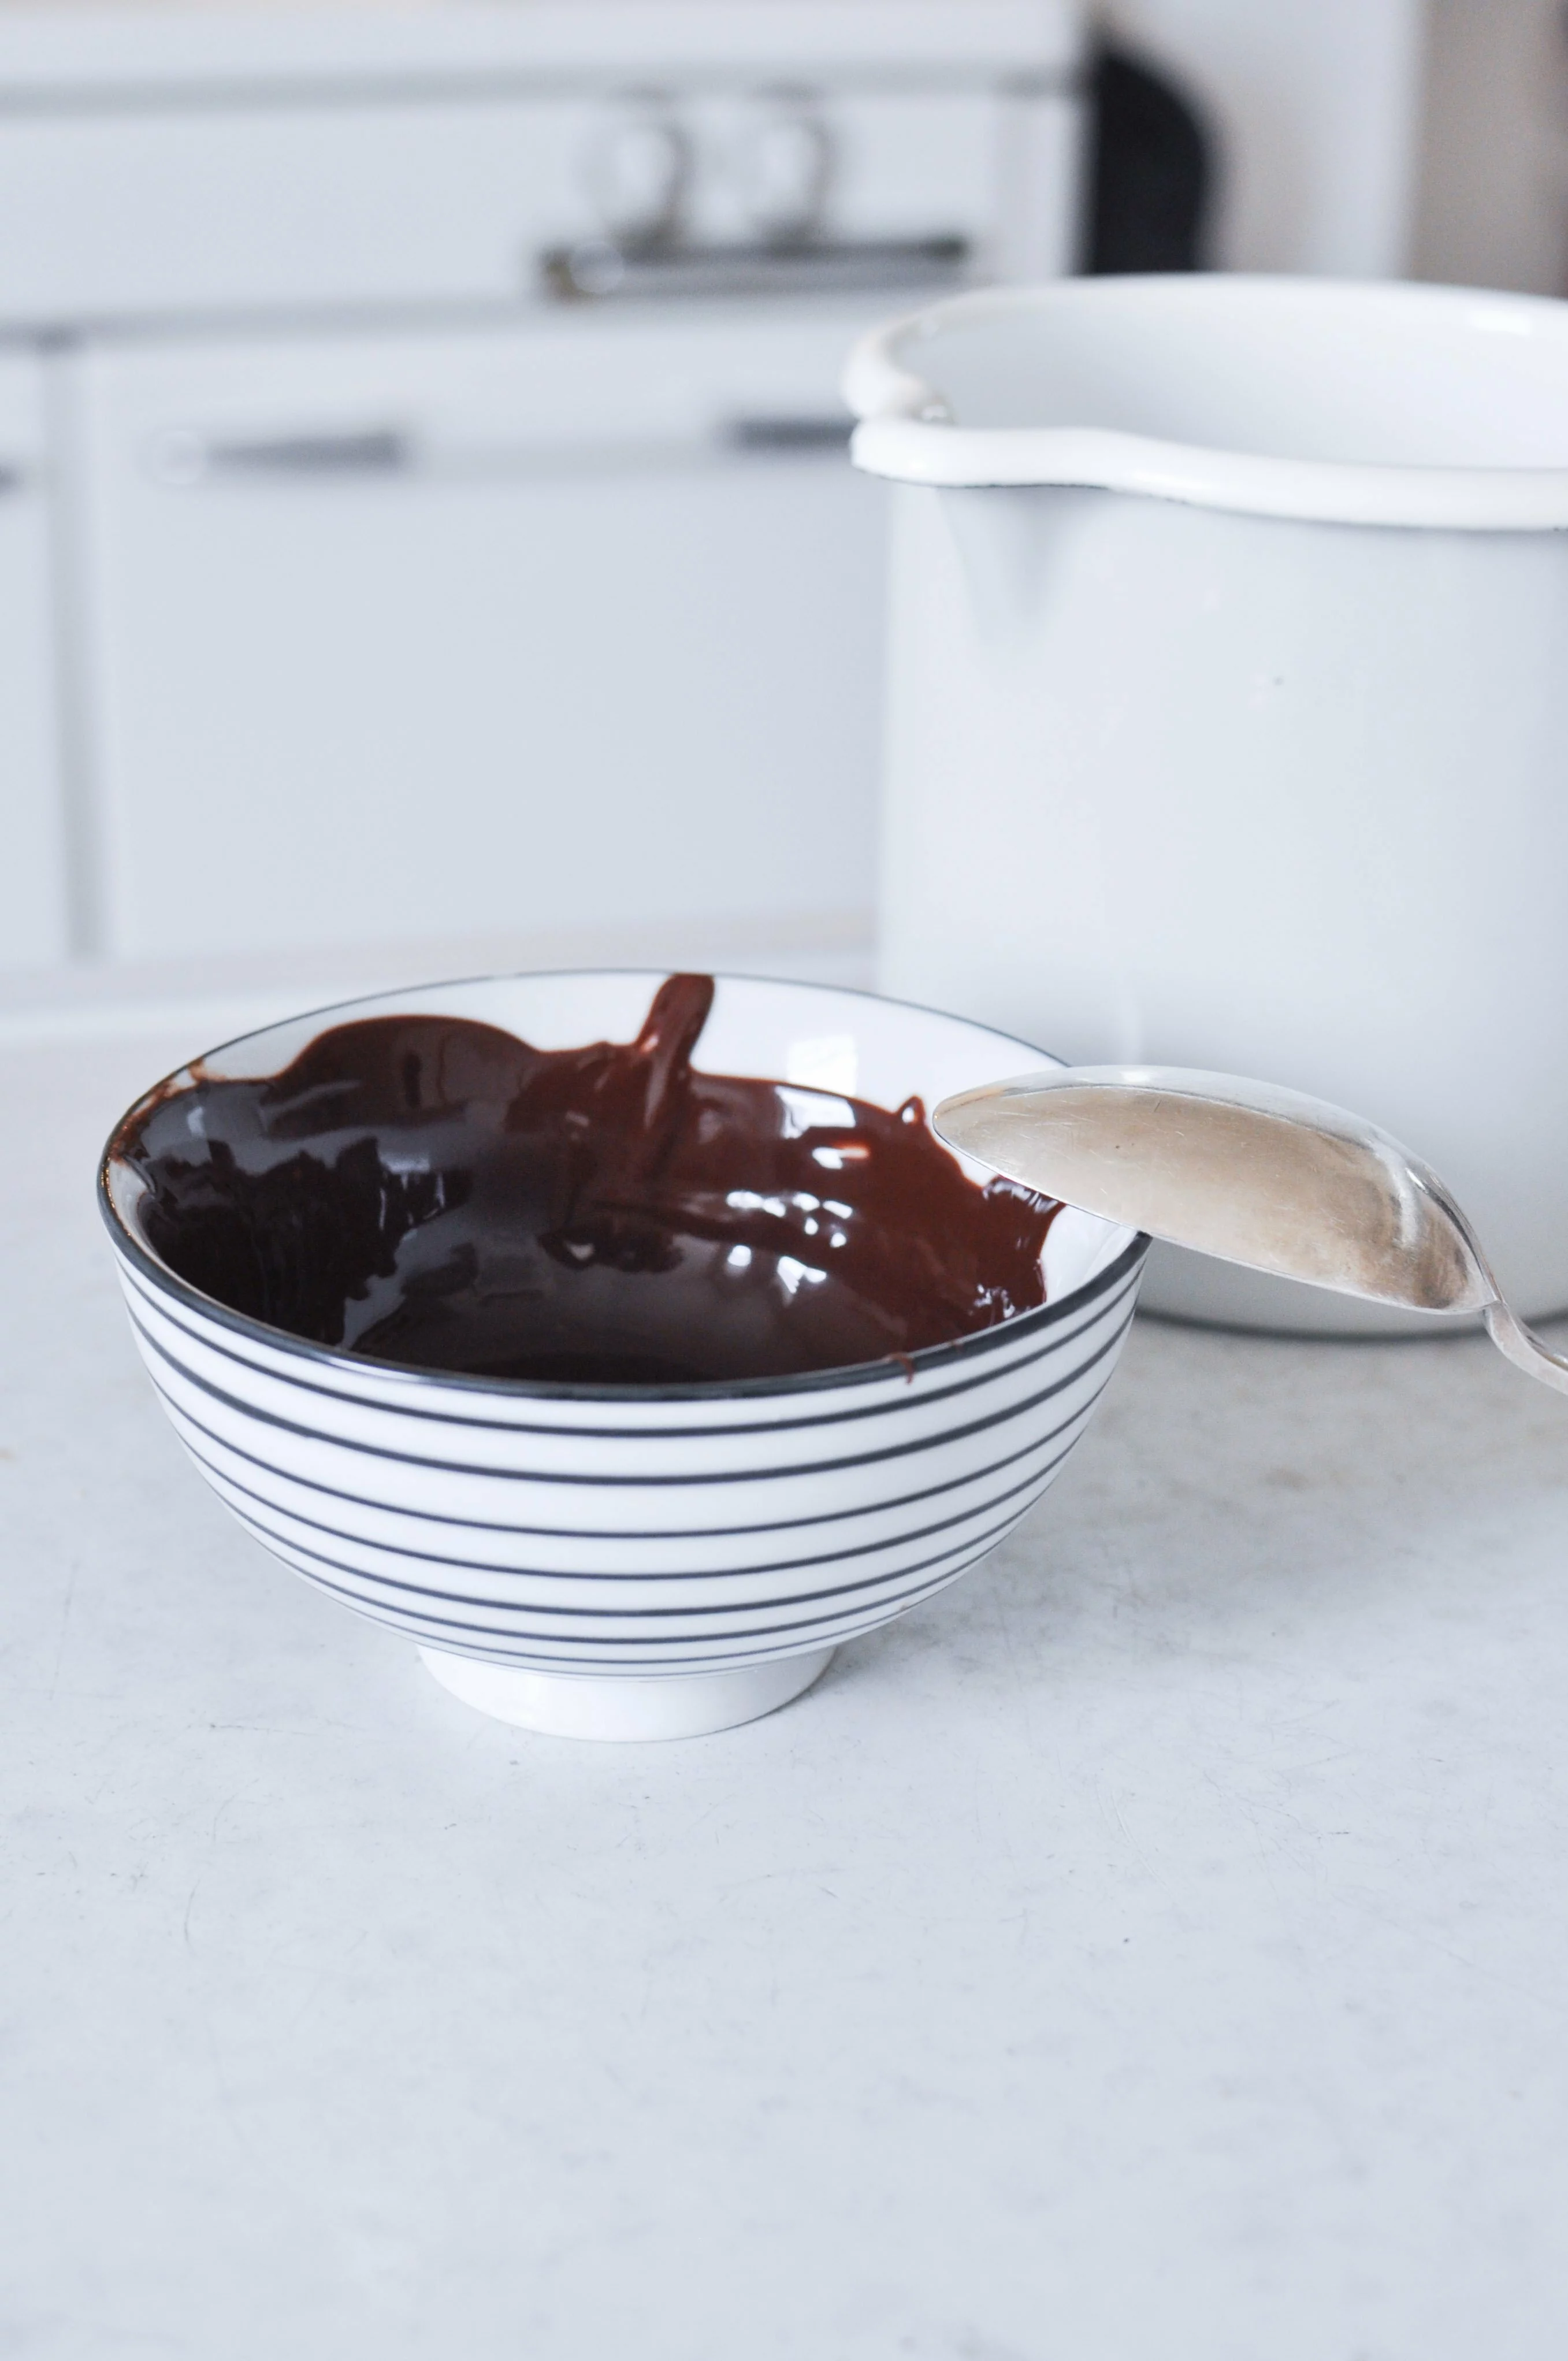
Whilst the biscuits cool, boil a small pan of water and melt the dark chocolate in a bowl over the pan.

Dip half of each biscuit in the melted chocolate, sprinkle with sea salt and place in the fridge for about 5 minutes to set.

DSC_8248 DSC_8285 DSC_8314-2     DSC_8472 DSC_8480

URBAN OUTFITTERS: butternut squash and quinoa burger

DSC_6486

In collaboration with Urban Outfitters, I’ve put together a fresh and bright colourful for a little festival food inspiration that’s protein packed, antioxidant rich and crammed with healthy fats. If you fancy an alternative to the standard beef burger for a summer barbeque or picnic, this vegetarian and gluten free burger is incredibly juicy, hearty and nutritious – totally blowing away the mound-of-earth misconception of veggie burgers. The balance of the spices, depth of the ground walnuts and kick of the fresh coriander and garlic creates a truly flavour packed treat. The idea originated from ingredients that make up one of my favourite salads – spicy roasted squash, quinoa, goats cheese, avocado, red onion. The thought was to turn the concoction of flavours into a tasty patty, so really, when you’re eating this burger you’re basically eating a salad? Warning: it was difficult to refrain from demolishing the mixture before I could even shape the burgers.

You can make up a batch of the burger mix up and freeze the patties ready for a quick summer weeknight dinner or a weekend BBQ. They also make a delicious packed lunch, stored in this Gentlemen’s Hardware Aluminium Lunch Tin; for those days when you feel like eating like a gentleman. The tins are also the perfect size for fillings with a few patties to share with friends.

Check out the post on the Urban Outfitters blog here.

DSC_6425

Butternut squash and quinoa burgers with goats’ cheese

Ingredients
[Makes 5-6 burgers]

700g peeled and cubed butternut squash
1/2 tsp sweet paprika
1 tsp cayenne pepper
Sea salt and pepper
1 tbsp coconut oil/ghee

1/2 cup quinoa (preferably soaked for 8 hours, or if you can’t soak it, thoroughly wash and rinse the quinoa and follow packet instructions)
1/2 cup water

3/4 cup walnuts
1/4 cup sunflower seeds
1 onion, finely diced (white or red)
2 garlic gloves, minced
1/2 packed cup fresh coriander leaves, finely chopped
1 free range egg
Coconut oil to fry

Extras:
Goats’ cheese
Avocado
Red onion
Tomato

DSC_6247DSC_6391

Recipe

1. Pre-heat the oven to 200 C/400 F. Chop the butternut squash into very small cubes and coat in the spices, salt and pepper. Place coconut oil in a baking tray and place it in the oven for a couple of minutes to melt. Then chuck the squash into the baking tray and coat with the melted oil. Bake this for about 40 minutes or until the squash is very soft.

2. Whilst the squash bakes, cook your quinoa. Soaking the quinoa before cooking makes it easier to digest and enhances the nutrients. If you are soaking, thoroughly rinse, bring 1/2 cup water to the boil, add the quinoa, reduce to a low heat and cook for about 15 minutes. Alternatively, if you do not soak the quinoa, follow the packet instructions for cooking.

3. Whilst you wait for everything to cook, chop the onion, garlic, and coriander. Place the walnuts and sunflower seeds into a high speed blender or food processor and blitz until a fine flour forms.

4. Once the squash is cooked, take the soft cubes out of the oven and place in a large mixing bowl. Using a hand-held masher, puree the squash cubes together. Add the cooked quinoa, ground walnut and sunflower seeds, onion, garlic and coriander and stir together. Now crack the egg into a small bowl, whisk and add to the rest of the mixture. As I do not currently have a food processor, I have combined the burger mix by hand, however, you could simply place all the ingredients into a food processor to save time and washing up! I actually really like the texture that the hand-mixed method gives.

DSC_6445

5. Take a couple of large spoonful of the mix into your hands and mould it into your burger shapes. I found this mix made about 5 fairly large patties, however, feel free to experiment and make smaller sized burgers. You could also create smaller, flatter burgers which could be stacked with goats’ cheese and avocado in the middle.

6. Now take a frying pan or griddle, add a spoonful of coconut oil and set on a high heat. Make sure the pan is very hot so that the burgers cook well in the oil. Once hot enough, add one of the burgers, turn the heat down to a medium and fry the burgers on each side for a couple of minutes until golden. Repeat this for each burger. Alternatively, you could also try cooking these patties a barbeque, with some grilled Portobello mushrooms.

7. Crumble on some goats’ cheese, a few slices of avocado and any other garnish you wish. A tahini dressing or dip or hummus would also taste great with this!

DSC_6403DSC_6536DSC_6574

Harissa Hummus


Happy International Hummus Day aka but new favourite day.

Hummus, houmous, humous, humus? Whatever the true spelling, you can’t not mark international hummus day, so I’ve decided to spice up the standard recipe with a little bit of a Tunisian twist. I’ve been using the harissa spice mix a lot in cooking lately; from baked sweet potato fries, roasted butternut squash or celeriac and lamb tagines. I’ve blended up a quick hummus with lots of flavour, that packs in the antioxidants and immunity boosting properties of the spices, whilst the chickpeas and tahini are a great source of protein, calcium and iron – fab for bone, muscle, skin, and blood health.

1 tin chickpeas
2 cloves garlic
1 heaped tbsp tahini
2-3 tbsp olive oil
Juice of 1 lemon
2 tbsp of water to thin (or more)
1 tsp harissa powder
Sea salt and pepper

Chopped parsley, olive oil, sesame seeds, harissa, or more S+P to garnish.

Drain and rinse the chickpeas (or soak and boil your own). Put all of the ingredients into a food processor or blender and pulse until smooth.


Coconut yogurt + roasted beetroot dip

DSC_4968-2

Inspired by part of a lunch I had at Raw Press last month – a divine baked beetroot with a blob of coconut yogurt on top – I wanted replicate the melt-in-the-mouth delicious-ness in the form of a sweet yet spicy dip. This is a perfect side to accompany some baked rosemary sweet potato fries or fresh crudités. I’ve used the natural coconut yogurt by the Coconut Collaborative for an incredibly creamy flavour. Although here I could only get my hands on the purple packaging which comes with a small packet of seeds and berries, the flavour of the yogurt is still natural and I have just reserved the seed mix for breakfasts/smoothies.

DSC_4991-2DSC_5096

DSC_4415

Behold, yogurt made from the milk of the coconut!

The dip:

2 small beetroot, roasted
1/2 cup coconut yogurt
2 cloves of garlic
1 tbsp. tahini
1 tsp tahini
Juice of 1/2 lemon/lime
1 tbsp extra virgin olive oil
1 spring onion
A handful of fresh coriander
1 tsp cumin
Pinch of cayenne, paprika and chilli flakes
Sea salt and pepper

Preheat the oven to 200C/400F. Scrub and dry the beets then wrap each one in tin foil. Bake them for about a hour, until soft on the inside. Once cooked, leave to cool and assemble the rest of the dip ingredients. Once cool, place the ingredients in a blender or food processor and blend until smooth. Adjust the spices to your liking. As I’ve said before, I’m a spicy food kinda gal so used quite large pinches of spices, but just go with your instinct. To serve, drizzle some extra chilli flakes, olive oil and some sesame seeds (toasted or raw).

I served the dip with some baked fries, made by slicing 1 sweet potato and 1 large carrot and roasting in ghee/coconut oil, S+P, cayenne, rosemary and cumin. Simply bake for about 30-40 minutes, whilst the beetroot cooking! This would also be lovely with a sprinkle of feta and a fresh rocket salad.

 DSC_5003

Watercress is the new Kale & 2 green smoothie recipes

DSC_9640

Why you need watercress in your life.

It seemed Kale was the reigning champ of the health food world in 2014, but move over, there’s a new superfood in the spotlight. It may not be printed on a sweater spread across Beyoncé’s chest (see here and here), but watercress sure is pretty impressive in terms of nutritional value.

Rich in an array of vitamins and minerals, including vitamins K, A, C, B, watercress has more iron than spinach, more calcium than milk and as much vitamin C as an orange. Rich in fibre, with anti-inflammatory properties, it can successfully aid digestive function and is essential for overall blood and liver health. The vitamins A and C help to keep skin soft and smooth, whilst also providing healthy hair and strong nails.

The unique mustard oil found in the plant, gives watercress a slight peppery flavour which makes it great in soups, salads and a lovely accompany for fish/meat/roasted veg. However, adding watercress to smoothies makes an easy way to obtain all of the nutrients in a discrete way.

Below, I’ve posted two green smoothie recipes; one very green smoothie and another creamy green smoothie.

DSC_9595-2DSC_9749

#1 – A Very Green Smoothie

Refreshing, hydrating and easy to digest, this smoothie is an extremely energising as part of your breakfast in the morning or a great snack to keep you going throughout the day.

Yields 1 (or 2 smaller)

1 cup water
1 tsp coconut oil (I like Biona)
A large handful(s) of spinach
A handful of watercress
The juice of 1/2 a lemon
Chunk of fresh ginger, finely chopped
1/4 avocado
1/2 stick of celery
1/4 large cucumber
1 green apple
1/2 frozen mango
Optional – greens powder (spirulina, chlorella, wheatgrass etc)

DSC_9648

DSC_9676

#2 – The Creamy Green Smoothie

If you’re new to green smoothies, I suggest you try this one. The avocado and frozen banana and hint of mango give an extremely creamy and naturally sweet taste and texture, making it feel like a treat rather than a mysterious, grassy concoction. As an alternative to the mango, you could also try another fruit like nectarine or peach. I’ve use almond milk here, however other nut milks taste gorgeous – particularly cashew or brazil nut milks!

1 cup almond milk (I use homemade)
Large handful(s) spinach
1 very ripe, frozen banana
1/4-1/2 mango, frozen
Juice of 1/2 a lime
1 tsp chia seeds

DSC_9746-2 DSC_9766

Spiced butternut squash, carrot + cauliflower soup

DSC_6636-2Winter means one thing – soup season. There is nothing more satisfying than a big bowl of soup for tackling those cold, dark nights, but put away those tin openers (sorry Heinz) and get chopping some fresh produce for a nutrient rich, hearty version. Making your own soup is soup-er easy [hangs head in shame] and can be whipped up quickly in the evenings or even be left to cook slowly for a few hours on a low, low heat. Butternut squash is packed with vitamins, which along with the carrots and fresh ginger (and basically every ingredient in the soup) can boost your immune system to help prevents colds over the chilly winter months.

DSC_6631DSC_6629-2

Spiced Butternut squash, carrot and cauliflower soup
Makes 3.5 Litres / Serves about 6 or more

Ingredients
1 tbsp coconut oil
1 onion
3 garlic gloves
2 celery sticks
4 carrots
1/2 tsp cumin
1/2 tsp cayenne pepper
1/4 tsp turmeric
1.2 tsp sweet paprika
1/2-1 tsp cinnamon
Pinch nutmeg
Asmall chunk of fresh ginger
1 large butternut squash, chopped into small cubes
1/2 a large cauliflower, cut into small pieces
1 cup red split lentils, rinsed
2 litres of organic vegetable stock/boullion
Sea salt + pepper
Fresh rosemary

Finely chop the onions, ginger, celery and carrots, and prepare the rest of the veg. In a large pot, fry the onion and garlic in coconut oil until brown, add the carrots and celery and fry for a couple of minutes. Combine the spices to the pot, rinse and add the lentils, cubed butternut squash, cauliflower and stock, and then cook for about an hour on a low-medium heat. As I said before, you can also keep this cooking for longer on a low heat, until you’re ready to blend. Turn off the heat and pour the soup mixture in batches into a blender, and blitz until soup-y. If you like, you can also keep a small portion of the original mixture and then add it to the blended soup to leave some lumps. Transfer the soup back into the original pot and season with more sea salt/pepper and fresh rosemary. I love to top my soup with a drizzle of extra virgin olive oil, a pinch of cayenne pepper, black pepper and black sesame seeds.

When I made this soup, I hadn’t intended to make quite as much as I did and so this recipe yields a massive pot. Feel free to adjust the ingredients to suit your quantities, or alternatively, you could make a big batch and freeze in portions to use throughout the month for a quick lunch/dinner fix.

DSC_6657love, Ellie.


Quinoa porridge

DSC_5467 DSC_5491DSC_5457DSC_5518

Quinoa porridge is one of my favourite breakfasts at the moment, especially with some fresh homemade nut milk. If you have a batch of cooked quinoa in the fridge, this breakfast can be made with 1 cup of cooked quinoa, heated up in 1 cup of nut milk! Alternatively, follow the steps below to make a warm cereal in the morning. Quinoa is a gluten-free grain, rich in nutrients and high in protein, vitamins and minerals, fibre, and amino acids. So, this porridge is great for getting your brain going in the morning, and works well with the addition of maca powder, which can increase energy. Maca is an ancient root from Peru which has a malty flavour and is packed with vitamins.

Quinoa porridge
Serves 1

1/2 cup quinoa (soaked overnight)
1/2 cup water
1 cup almond milk (or any other nut milk, brazil nut tastes amazing in this!)
1 tsp vanilla extract
Pinch of nutmeg +cardamom
1 tsp maca powder (optional)
1 mashed banana (optional, but recommended)

In the evening, soak the quinoa overnight – place it in a bowl with about 1 cup of filtered water, cover, and leave on the work top. Soaking activates the quinoa, enhancing the goodness and making it easier to digest. In the morning, drain and rinse the quinoa, place it in the boiling water, cover and cook on a low heat for 12 minutes. After this time, add the nut milk, a pinch of nutmeg and cardamom and the vanilla. If using a banana, mash this in a small bowl and add to the pan. Mix in the maca powder and stir for a couple of minutes until most of the milk has dissolved.

Top your porridge with fruit/nuts/seeds/superfoods. My favourite combination is banana quinoa porridge with cashews, goji berries, cacao nibs and sunflower seeds. What’s yours?

Crunchy Brown Rice Salad

Great for easy summer evenings or brightening up dreary autumn day, this salad makes a hearty meal or beautiful side dish to share with family – quite literally a rainbow salad that looks great served in a big bowl on the table. The blend of the almonds, sesame seeds and brown rice gives a rich, nutty flavour, and works beautifully with the colourful, crunchy cabbage and carrot combination (alliteration queen over here). I also love the creamy taste from mix of avocado and hint of tahini in the salad dressing. As you will probably come to learn, tahini is a staple in my cooking and is used a lot in recipes; from salads, breakfast, baking, and of course, hummus. So if you don’t own a jar of the vitamin-rich stuff, I strongly suggest you invest in one, and if you then find the taste a little strange at first, I advise that you learn to love it sister.

IMG_1169.JPG

Crunchy Brown Rice Salad
Serves 4

Ingredients:

1 cup short grain brown rice
1/2 large red cabbage
1-2 large carrots
1 small red onion
1/2 red chilli
2 spring onions
1 avocado
handful fresh coriander, chopped
pinch of fresh mint, finely chopped
1/4 cup almonds, toasted
sprinkle of black/white sesame seeds
black pepper

Dressing:
Juice of 1 small lemon
1-2 tbsp olive oil
1 tbsp tahini
1 tbsp filtered water
1 tsp tamari
black pepper & sea salt

To cook the rice, bring 2 cups of filtered water to the boil, rinse the rice, and place it in a saucepan with sea salt. Cover with a lid, lower the heat and cook gently for about 30 minutes or until all the water has been absorbed. Once cooked, empty the rice into a bowl and leave to cool.
Dry toast the almonds in a pan until slightly brown and set aside to cool. Once cool, chop into small pieces.
Finely slice the red cabbage and place in a bowl. You could also use a grater or a food processor to chop the cabbage.
Grate the carrot, finely slice the red onion, fresh chilli, spring onions and fresh herbs, and combine with the red cabbage.
Add the diced avocado, chopped almonds, sesame seeds and black pepper.
Combine all the salad dressing ingredients in a small cup or jar and mix together, before pouring onto the salad.


IMG_1174.JPG

Lentil Chilli

IMG_8509.JPG

This Lentil Chilli was a little bit of an experiment tonight, hence the random spoonful of tahini and dash of cacao powder – which I would not usually add, however, it strangely worked and although barely noticeable, adds to the flavour and consistency!

Lentil Chilli
Serves 3-4

Ingredients:

1 tbsp coconut oil
1 onion
Small chunk fresh ginger, finely chopped
2 garlic cloves, crushed
A small handful of fresh coriander, chopped
1/2 large red chilli
1 tbsp ground cumin
1 tsp smoked paprika
1 1/2 tsp cinnamon
1-2 tsp oregano
Pinch nutmeg
Pinch ground coriander
1/2 tsp cayenne pepper
2-3 tbsp tomato puree
1/2 cup red lentils
1/2 cup green lentils
3 mushrooms, chopped into small pieces
1 tin of kidney beans, drained
1 tbsp tahini
1/2-1 tsp cacao powder
3-4 cups water
sea salt and pepper

Fry the onion, ginger, chilli, coriander and garlic in a pan with coconut oil for about 5-10 minutes..
Add in the spices, tomato puree and stir the contents of the pan together – this should form a sort of paste.
Then rinse the lentils and add them into the pot with the finely chopped mushrooms.
Add about 3 cups of water, sea salt and pepper, and cook on a medium heat for about 10 minutes.
After 10 minutes add the drained kidney beans, cacao and tahini.
Continue cooking, stirring occasionally and adding more water if required. After 20 minutes the chilli should be cooked and good to eat, however, you can also continue cooking the chilli for a further 20-30 minutes on a very low heat to really soften and blend the ingredients.


Spicy Roasted Sweet Potato, Lentil Salad & Tahini Dressing

DSC_3510

This meal is a definite favourite of my mum and I, and although this one is made with sweet potato, the salad is equally delicious with a roasted butternut squash cubes to replace to sweet potato! It’s really easy to prepare and makes a great packed lunch. The tahini dressing is a personal fav – used on pretty much anything – and I obviously used more on my salad than is picture above (did it or the ‘gram).

DSC_3516

Spicy Roasted Sweet Potato, Lentil Salad & Tahini Dressing 
Serves two

The roasted potato:
3 small sweet potatoes
1 tsp cayenne pepper
1/2 tsp cinnamon
1/2 tsp paprika
pink/sea salt and black pepper
fresh or dried coriander
chopped fresh chilli (optional)
1-2 tbsp coconut oil
A handful of pumpkin or sunflower seeds

The lemon-tahini dressing: (will make enough with some left over…maybe)
3 tbsp tahini
2-4 tbsp filtered water (more if needed)
Juice of 1 lemon
1 garlic glove
Pepper

The rest:
1 cup green lentils
1 small red onion
1 avocado
Fresh coriander
1 tsp sumac
Large handfuls of rocket/arugula
1 cooked beetroot (optional)

Wash, peel and slice the sweet potato into cubes, toss with the spices, salt, pepper, optional coriander and melted coconut oil. Roast in the oven for about 40-45 minutes. Once they have been cooking for 30 minutes, chuck in the seeds to toast.

Cook the lentils in 2 cups of water for about 30 minutes on a low heat.

Make the dressing and prepare the rest of the ingredients. Once everything is ready, assemble and drizzle with the tahini dressing – store any left over dressing in the fridge, however, feel free to use it all if you want to and just go by your own judgement.

DSC_3539 bright